Monday, June 30, 2008

Installation of Lotus Foundations - Part 2

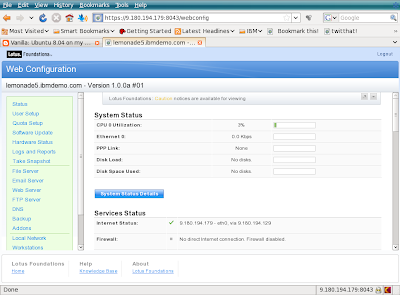
Once you have logged in to Foundations as the root user you should see the "System Status" screen where you can make alterations to your system.


At this point the Foundations server is running entirely in memory as there are no Hard Disks available. Looking further through the “Services Status” in the screenshot above you will find the following detail.


Click the "Configure disk #1 as a standalone disk" to format the hard disk and write the Foundations code to it. As this example was created in a VMware image there is no existant data to worry about - just make sure you don't overwrite something important.

Click the "Update Status" button to keep track of when the server has finished configuring the disk.

Once the “Update Status” shows that the disk is available – srcoll down to the bottom of the “Web Configuration” page and choose to “Shutdown” the server. Edit the settings for the VM image and set the DVD drive to be the physical drive, we don't want it to open the ISO image now that the Foundations server can boot fron the hard disk.

Restart the Vmware image and login as root.

At this point the foundations Core server has been installed. The Next step is to install “Foundations Start”.

Installation of Lotus Foundations - Part 1

Installation of Foundations into VMWare

I created a new VMware machine as a Suse Linux machine with 20GB HD. In the VM settings for the machine I set the DVD to point to the Foundations ISO file, "10_00a1.iso", as the CD drive.

When the Virtual Machine starts the ISO file is loaded and boots Lotus Foundations into memory and displays the following screen.


From your host machine point firefox at https//9.180.19.179:8043. (your ipaddress will differ). You will likely have to add a security exception to add the x.509 certificate for the Foundations server to your browser. Then you should see the following screen, followed by a similar IBM Software Agreement screen.


Once the agreements have been accepted you will see the initial setup screen below.


Fill in a suitable password for the root user and enter your domain name. If you have an Activation Key – fill it in – otherwise the server will run in a time limited mode. Once you click “Save Changes” the root account is created and you are provided with a "Login" button.

Click to Login, and enter the username “root” and the pasword you created previously. You can then view and alter the system status and configuration in the next screen


Thursday, June 19, 2008

Ubuntu 8.04 on my Thinkpad T60p (Part 4)

I was just chatting with Dave Hay about VMWare Workstation on Ubuntu.

After installing VMWare and running "/usr/bin/vmware-config.pl" to configure it - sometimes VMWare will not start. Typically at this stage most people run /usr/bin/vmware-config.pl again in the vain hope that it will "just start working" this time.

It can be easier than that.

Just rename the file "/etc/vmware/not_configured" to something else such as "/etc/vmware/not_configured_backup" (or just delete it).


Try starting VMWare again - it should now work. You might just have to run "vmware-config.pl" again if there really is something wrong.

If, for some apparently random reason, VMWare decides there is anything less than perfect it seem to generate this file. All you have to do is update your system and apply kernel patches to get the file to regenerate.

Ubuntu 8.04 on my Thinkpad T60p (Part 3)

I was due to attend a web conference today and found that Firefox was not correctly supporting Java.

Some of the fixes on the interweb for this issue are truly horrific and over engineered. After a little research I fixed the problem like this

First I created the link to the java plugin in the firefox plugin directory... using the commands below...

cd /usr/lib/firefox-3.0/plugins$
sudo ln -s /usr/lib/jvm/java-6-sun/jre/plugin/i386/ns7/libjavaplugin_oji.so

Second I used the Synaptic Package Manager to remove the package called "icedtea-gcjwebplugin". This was courtesy of Eirik

Just to test that java was working properly - went to www.java.com, clicked on "do i have Java" and saw this little fellow...

Tuesday, June 17, 2008

Ubuntu 8.04 on my Thinkpad T60p (Part 2)

Now my thinkpad T60p is running Ubuntu successfully with Lotus Notes 8.5, Symphony office suite, video and the VPN into work is a treat (Lotus Mobile Connect).

A part of my job is giving customer briefings - so I need to be able to use projectors and external screens from my Laptop. This has previously been a real issue when running with Linux. Now it works.

To get an external screen to work I used "Envy", an automated installer for Video drivers. First I used Synaptic to install "envyng-gtk". Then I ran Envy from the menu "Applications/System tools/EnvyNG". This detected my video card, an ATI, and installed the appropriate drivers. This also installed the "ATI Catalyst Control Center" that allowed me to setup the resolution for an external monitor.

Thursday, June 12, 2008

Sametime Advanced and Active Directory

I was working with Mark Rattray with a customer in Mayfair, London, on a Sametime Advanced installation.

We started off by installing sametime Standard 8.0.1 server. We used the customers active directory (2003) directly without directory assistance. At this stage we ran a few tests to ensure the system was wrking well.

Next we installed the Sametime Advanceed server. Again we used the Active Directory for the user directory - Mark was superb in his understanding of active directory and soon made all the right choices to get the LDAP integration sorted - although this was not to the standard LDAP port.

Once both servers were up and running we setup Single Sign On to allow integration between ST Standard and ST Advanced web interfaces. Finally we setup the Sametiem plugins to be delivered directly to the users Sametie clients.

I believe this is the first Sametime Advandced installation on Active Directory at a customer site in the UK. Mark deserves full respect.

Thursday, June 05, 2008

Ubuntu 8.04 on my Thinkpad T60p

Now that my T60p has been repaired, after the LCD had developed multiple horizontal lines, I have upgraded the hard disk to 200GB at 7200rpm.

Ubuntu 8.04 installed sweetly.

To enable the desktop effects I had to enable the ATI drivers first. This was easily done by clicking the menu items System/Administration/Hardware Drivers - then click the box to enable the "ATI accelerated graphics driver". This is a non-free driver. The driver is downloadedand installed automatically and after a restart is ready for action. Then click the menu item System/Preferances/Appearance followed by the "Visual Effects" tab - then click "Extra".

Then the wobbly windows start working. :-)

Once that was all working I ran the Synaptic Package Manager and searched for "Simple Compiz Config Settings Manager" and installed it. The I ran it by the menu item "System/Preferences/ Advanced Desktop Effect Setting" and enabling "rotate cube".

Essential stuff. It's very smooth and the wireless setup was really easy.

Tuesday, June 03, 2008

goosh !

goosh is the unofficial Google shell...

and it is lovely.

Try it now - go on.

Monday, June 02, 2008

Sametime Advanced - Not that difficult shocker

Today I was working with a UK Business Partner who is working towards a deal on Sametime Advanced at a London based customer.

In order to get the partner up to speed we had already worked with the Sales team to understand the benefits of ST Advanced - however it had come time to help the technical team with their first test installation.

This was also my first installation of Sametime Advanced - so we started with a Windows 2003 server and installed Domino 8.0.1 and Sametime 8.0.1 authenticaing via LDAP. Then we installed the Sametime client and checked all was well. That's a simple Sametime Standard setup.

On with the advanced...

Next step was to install DB2 Enterprise Edition which went easily, followed by DB2 Search Extender.

I created the BRKRDB and STADV tables and installed the DB2 license key.

Next up was the install of MQ series, the system requirements showed that Eclipse was missing however this was automatically installed. There was also an install of an MQ fix pack downloaded from the fix pack website.

Then Event Broker was installed - quite simple, followed by configuration via ConfigureEB.bat which needed a little editing.

The last installation was for Sametime Advanced which included the underlying WebSphere Application Server.

A little standard configuration was required to setup SSO between WAS and Domino for http and the installation of the eclipse Plugins for Sametime Advanced into the Domino UpdateSite.nsf for and te job was done.
Although that seems like a lot of work, most of it was quite painless and I was impressed overall and felt confident with the result.

Quite good - and took about 5 hours total